Sending 5 bytes over Serial Port

The USB to RS-232 adapter always appears as COM5 when I plug it into the PC. I have another that always is assigned COM3. These were the original ports numbers I assigned upon installation.

For the heck of it, I did a hard reboot and tried your work again, but the radio did not respond.

To rule-out the radio is screwy, have you ever seen a case where a DCE is sensitive to a ‘flavor’ of software from which it gets its commands?

If not, then there is something different between the exe’s code and every code I tried in LabVIEW and Python as well as your code. Yes?

Thanks, Matt.
John

The quickest way to figure out how the problem was caused is to view the Tx signal, instead of guessing.

Thanks for the thought, Jach.

Here is one of many screen shots of the sent command as received on another COM port I performed very early in this exercise. The Data on the left was all returned in the software - and not filled-in by me. The port settings on the right were read by the Read EXE File VI. The elapsed time was the time that elapsed from the time I started the VI, moused to the sending software, clicked Run, and the data sent and received. The elapsed time was to see if there was some kind of Time factor between the QT/C++ app (which works) and the four variations of code which I wrote. To account for inconsistencies in mousing across from one app to another, I averaged the times over 10 iterations to compare with the C++ which was also run 10 times.

John

The PyVisa module is supposed to simplify communicating with instruments.

Can you try this simple script to see if you are able to communicate with your instrument.

import pyvisa
from pyvisa.constants import Parity

try:
    rm = pyvisa.ResourceManager()
    rm.list_resources()

    # Communicate via serial port on COM5
    transceiver_1000 = rm.open_resource('ASRL5::INSTR',
                                        baud_rate=4800,
                                        parity=Parity.none,
                                        stop_bits=2,
                                        data_bits=8
                                        )
    print(transceiver_1000.query('*IDN?'))

except FileNotFoundError:
    print('Could not communicate!')

except SerialException:
    print('Could not open port COM5!')

You will have to import the libray (if you are using an IDE other than IDLE, you may have to re-start it).

It’s expecting 2 stop bits.

Yeah, I know. But since I don’t have an instrument to connect to, I am attempting to do with the bare minimum. I have edited it a bit to catch potential exceptions.

Thank you, Paul.

The device is not an instrument, rather a radio. It has its own command set and does not respond to SCPI commands.

John

You’re able to communicate using Labview (from virtual instruments (.vi)), correct?
From the GUI screenshot that you provided it has a Labview icon and .vi extension.

From google search:

PyVISA and LabVIEW's Relationship: PyVISA is a Python wrapper for VISA (Virtual Instrument Software Architecture) libraries. LabVIEW often utilizes VISA for instrument control. The key is that PyVISA interacts with the VISA shared library (like NI-VISA), which LabVIEW also uses.

Shouldn’t it be compatible?

Have you attempted asking in, as the yaesu website recommends, in forums dedicated to ham radios that use this transceiver? Should be a good start.

John wrote:

If not, then there is something different between the exe’s code and every code I tried in LabVIEW and Python as well as your code.

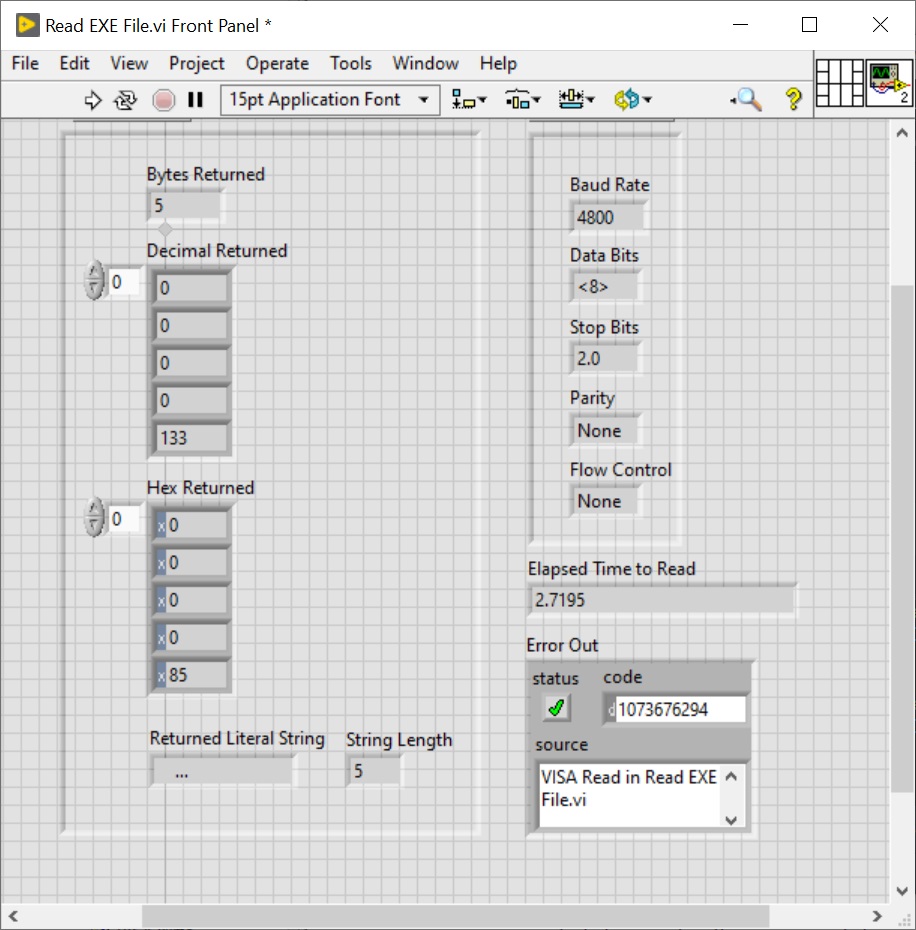
From that I take it that only the Qt app works.

The manual talks about TSR (Terminate and Stay Resident) and gives examples in Basic, which is from quite some years ago, so maybe the modern PCs are sending the bytes too fast for it.

The fact that it gives a maximum time between the bytes and has the “Pace” command (to slow down the responses) also suggest that the slower speed of computers at the time could sometimes have been a problem.

So, here’s a new version of the GUI in which you can set the delay between the bytes. It’s initially 0 ms, but you could try increasing it (up to a maximum of 200 ms):

# A simple GUI for testing talking to a FT-1000MP_Mark-V radio via the CAT/serial port.
#
from serial import Serial, SerialException
from tkinter.messagebox import showerror
import tkinter as tk

# The port to use.
DEFAULT_PORT = "COM5"

class App(tk.Tk):
    def __init__(self):
        super().__init__()
        self.title("Radio GUI")

        # Add a frame for the buttons.
        button_frame = tk.Frame(self)
        button_frame.pack(side=tk.TOP, fill=tk.X)

        # Add a "Port" entry.
        tk.Label(button_frame, text="Port:").pack(side=tk.LEFT)
        self.port_var = tk.StringVar(value=DEFAULT_PORT)
        self.port_entry = tk.Entry(button_frame, width=10, textvariable=self.port_var)
        self.port_entry.pack(side=tk.LEFT)

        # Add control over the delay between bytes.
        tk.Label(button_frame, text="Delay between bytes (ms):").pack(side=tk.LEFT)
        self.delay_var = tk.IntVar(value=0)
        self.delay_entry = tk.Entry(button_frame, width=10, textvariable=self.delay_var)
        self.delay_entry.pack(side=tk.LEFT)

        # Add the "Connect" button.
        self.connect_button = tk.Button(button_frame, text="Connect", padx=5, pady=5, command=self.on_connect)
        self.connect_button.pack(side=tk.LEFT)

        # Add the "Clear log" button.
        self.clear_log_button = tk.Button(button_frame, text="Clear log", padx=5, pady=5, command=self.on_clear_log)
        self.clear_log_button.pack(side=tk.LEFT)

        # Add the "A -> B" button.
        self.copy_vfo_a_button = tk.Button(button_frame, text="A -> B", padx=5, pady=5, command=lambda: self.send("A -> B", bytes.fromhex("00 00 00 00 85")))
        self.copy_vfo_a_button.pack(side=tk.LEFT)

        # Add the "Read status flags" button.
        self.read_status_flags_button = tk.Button(button_frame, text="Read status flags", padx=5, pady=5, command=lambda: self.send("Read status flags", bytes.fromhex("00 00 00 00 FA")))
        self.read_status_flags_button.pack(side=tk.LEFT)

        # Add a frame to display the log.
        response_frame = tk.Frame(self)
        response_frame.pack(side=tk.TOP, fill=tk.BOTH, expand=True)

        # Add a title label for the log frame.
        tk.Label(response_frame, text="Log").pack(side=tk.TOP)

        # Add a listbox with a scrollbar to display the log.
        self.log_listbox = tk.Listbox(response_frame)
        self.log_listbox.pack(side=tk.LEFT, fill=tk.BOTH, expand=True)
        scrollbar = tk.Scrollbar(response_frame, orient=tk.VERTICAL, command=self.log_listbox.yview)
        scrollbar.pack(side=tk.RIGHT, fill=tk.Y)
        self.log_listbox.configure(yscrollcommand=scrollbar.set)

        # The serial port and response buffer.
        self.serial_port = None
        self.response_buffer = b""

        # Disable the buttons initially.
        self.enable_buttons(False)

        self.send_buffer = b""

        # Periodically check for a response.
        self.on_tick()

    def on_tick(self):
        try:
            delay = self.delay_var.get()
        except tk.TclError:
            delay = 0

        if self.serial_port is not None:
            if self.send_buffer:

                if delay == 0:
                    # Send it all at once.
                    self.serial_port.send(self.send_buffer)
                    self.send_buffer = b""
                else:
                    # Send by 1 byte now, any others later.
                    self.serial_port.send(self.send_buffer[ : 1])
                    self.send_buffer = self.send_buffer[1 : ]

            # Read any (additional) response from the serial port. We want to append to the current response, if any.
            if self.response_buffer:
                self.log_listbox.delete(tk.END)

            self.response_buffer += self.serial_port.read(self.serial_port.in_waiting)

            if self.response_buffer:
                self.log_listbox.insert(tk.END, self.response_buffer.hex(" ").upper())

        # Schedule the next check or send.
        if delay == 0:
            # We're sending it all at once, so we don't need a delay for it.
            delay = 200

        self.after(delay, self.on_tick)

    def on_connect(self):
        if self.serial_port is None:
            # Ensure that the delay is valid.
            delay = self.delay_var.get()

            if delay < 0:
                delay = 0
            elif delay > 200:
                delay = 200

            self.delay_var.set(delay)

            # Try to connect to the serial port.
            try:
                self.serial_port = Serial(port=self.port_var.get(), baudrate=4800, parity="N", stopbits=2, bytesize=8)
            except SerialException as ex:
                showerror(self.title(), str(ex))
            else:
                # We connected successfully, so enable the buttons.
                self.enable_buttons(True)
                self.connect_button["text"] = "Disconnect"
        else:
            # Disconnect from the serial port and disable the buttons.
            self.serial_port.close()
            self.serial_port = None
            self.connect_button["text"] = "Connect"
            self.enable_buttons(False)

    def on_clear_log(self):
        self.log_listbox.delete(0, tk.END)
        self.response_buffer = b""

    def send(self, description, data):
        if self.serial_port is None:
            return

        # We're going to send a command, so log the action and clear the response buffer.
        self.log_listbox.insert(tk.END, f"[{description}]")
        self.response_buffer = b""

        try:
            self.serial_port.write(data)
            self.serial_port.flush()
        except SerialException as ex:
            showerror(self.title(), str(ex))
            self.serial_port.close()
            self.serial_port = None
            self.connect_button["text"] = "Connect"
            self.enable_buttons(False)

    def enable_buttons(self, enable):
        # These must be disabled when connected.
        new_state = tk.DISABLED if enable else tk.NORMAL
        self.port_entry["state"] = new_state
        self.delay_entry = new_state

        # These must be enabled when connected.
        new_state = tk.NORMAL if enable else tk.DISABLED
        self.copy_vfo_a_button["state"] = new_state
        self.read_status_flags_button["state"] = new_state

App().mainloop()
1 Like

Hi Paul,

Yes, I’ve trolled Ham Radio sites for my answer. The radio is now considered a Legacy Radio as it was manufactured in 1999 and is the first of a series of 4 radios made by Yaesu that supported CAT commands. The age, combined with the fact that Yaesu changed their protocol has made this very difficult. The exe which I refer to was written by an incedibly generous and patient man I found on a forum who was a driver software specialist and a Yaesu enthusiast. The question is why his software works and all other attempts of duplication fail. He hasn’t the answer and I am redescent to ask him more questions as he put a great deal of time to get this far.

Yes, the Read app is a VI and yes, LabVIEW can send SCPI commands as can any language. Its forte is a library of VIs that arguably makes it a good tool for data Aquisition. Regarding SCPI, the radio does not understand such commands, rather it uses its own protocol for communication - one I am trying to figure out. I used LabVIEW originally because it was the only software on my computer that had a Serial Library, and I thought I could quickly confirm the format of how the bytes should be arranged. That proved to not be so.

I moved to Python reluctantly as I am not even close to being proficient and after four failed attempts posed the question to this Group.

Thanks for the input. Always good to cover all bases!
John

1 Like

Hi Matthew, thanks for hanging in there.

Yes, only the QT app works. He is using QT not only for a GUI but its library to access the COM port.

My interpretation of the TSR code is they are speaking of Logging Software as they are talking in terms of Contesting. I have no apps that are TSR and related to this project.

I think the “Pace” command is for Reading data sent from the radio. The original computer I had connected to this radio before boxing it up in 2010 was running XP. It was probably a Pentium II. BTW, I still have the computer with a software package that DID work but using it turned into another rabbit hole as it will not pass POST.

In any event, I ran the latest version you kindly sent and it did not respond with 0, 1,50,100, 200ms pauses.

I guess at this point I have to consider the radio to be FUBAR but if it is, I cannot understand why it responds to the QT/C++. Have you ever seen this behavior before? Can that even happen??

Thanks,
John

I reviewed the user manual. On the surface, it seems to be not really complicated. I am also scratching my head on this one. Can you try the following script. In the script, I have defined three instructions:

  1. Copy data displayed in VFO-A to VFO-B
  2. Start antenna tuner
  3. Switch antenna tuner ON

The idea is to test three separate instructions, back to back, and see if there is a response. A delay of 100 ms is inserted between each byte that is sent (less than the 200 ms maximum).
Each five-byte block instruction is encapsulated within a list.

import serial
import time

byte_delay = 0.10

ser = serial.Serial(

    port='COM5',  # Or '/dev/ttyUSB0' on Linux/macOS
    baudrate=4800,
    parity=serial.PARITY_NONE,
    stopbits=serial.STOPBITS_TWO,
    bytesize=serial.EIGHTBITS,
    timeout=1  # Timeout in seconds
)

try:

    # Open the serial port
    if not ser.isOpen():
        ser.open()

    print(f"Serial port {ser.port} opened successfully.")

    # Instructions for testing - applied in the for loops
    A_to_B = ['\x00', '\x00', '\x00', '\x00', '\x85']
    tuner_ant_start = ['\x00', '\x00', '\x00', '\x00', '\x82']
    tuner_on = ['\x00', '\x00', '\x00', '\x00', '\x81']

    # Send individual bytes separated by 100 ms
    for byte_in in A_to_B:

        ser.write(byte_in.encode('latin1'))   # Encode bytes prior to sending
        time.sleep(byte_delay)       # Insert 100 ms delay between bytes

    time.sleep(5)
    # Send individual bytes separated by 100 ms
    for byte_in in tuner_ant_start:

        ser.write(byte_in.encode('latin1'))  # Encode bytes prior to sending
        time.sleep(byte_delay)       # Insert 100 ms delay between bytes
    time.sleep(5)
    # Send individual bytes separated by 100 ms
    for byte_in in tuner_on:

        ser.write(byte_in.encode('latin1'))  # Encode bytes prior to sending
        time.sleep(byte_delay)       # Insert 100 ms delay between bytes

    response = ser.readline().decode('utf-8').strip()

    if response:
        print(f"Received: {response}")

    ser.flush()

except FileNotFoundError:
    print('Could not communicate!')

except SerialException:
    print('Could not open port COM5!')

finally:
    # Close the serial port
    if ser.isOpen():
        ser.close()
        print(f"Serial port {ser.port} closed.")

Note that from the manual, an instruction in BASIC is written as:

CHR$(0);CHR$(0);CHR$(0);CHR$(2);CHR$(&HE);

This implies 5 distinct bytes sent separately per the semicolon ; separator.

From the user manual it states:

Each time a command instruction is being received from the computer via the CAT port, the CAT indicator appears in the display, then turns off afterward. 

Can you see if you observe anything on the display

First, hexadecimal escapes are written '\x85', not '0x85'. Secondly, the result of '\x85'.encode('utf8') is b'\xc2\x85' (two bytes, breaking the protocol). Either encode using 'latin1' or write then directly as bytes b'\x85'.

1 Like

Thank you.

I stand corrected. :+1:

I’ve updated the script btw.

Why not have bytstrings?

A_to_B = [b'\x00', b'\x00', b'\x00', b'\x00', b'\x85']

and then:

ser.write(byte_in)

Alternatively, have ints:

A_to_B = [0x00, 0x00, 0x00, 0x00, 0x85]

and:

ser.write(bytes([byte_in]))

By the way, the lines saying:

ser.write(byte_in.encode('latin1')

are missing a final ).

Thank you for the correciton.

Yes, I wanted it to be done via Python built-in encoding function is all.

Hi All,

Paul,

I made sure the tuner was enabled in the Menu Settings and if I am correct, you amended the code properly.

If my interpretation of the code is correct Paul, you are looping through three OpCodes and sending them sequentially.:

  • Copy VFO-A to VFO_B
  • Tuner Start
  • Tuner

The Tuner must be on before the tuner can perform a task, so I swapped Tuner Start with Tuner only to have the same results - nada in both configs. However, the code does not iterate through the three choices; rather runs only the first (Swap VFOs) per my “Read” app (that receives 15 bytes and does not time out). The radio does not respond, so something is awry with formatting or the Unkown we have all been chasing.

I have an RF amplifier in a critical phase of development on the bench, but am thinking I should perhaps clear the bench (or bring the O-scope to the radio shack) and capture:

  1. The TX pin of the COM cable and compare working/non-working code.
  2. Rout (receiver output) pin and Enable pin (for a trigger) of the UART to see what is the binary level/timing leaving the UART of the working/non-working codes.

The scope is a TDS-540 - another dinosaur but all I have. As I was an RF guy and not Digital, I have no idea how far into the menus I must go to perform the capture to memory to compare two (or more) digital waveforms - a test I have never performed. I never had to read a stream before, so this is also uncharted territory! I suppose I can start the measurement using a SCPI command (supposing there are enough points available in the scope for a 2 second test each) upon sending and stop the capture after 2 seconds. I have not performed this task because the exe works. I guess I need to read the O-scope manual…

Thoughts are greatly appreciated by all on whether this is a proper route or there is a simpler way to go. It just seems to me if one software works, any software should work! Am I wrong?

Thanks, very much!
John.

It is more than adequate. Its bandwidth is 500 MHz. The digital stream you’re measureing is at 4,800 baud rate. More than good enough.

Me too! :grinning_face:

Don’t worry, this is cake:

To capture the signal is pretty simple actually. I take it the signal should be in the range from 3.0V to 5.0 (depending on the circuit). Set the V/div to 2.0V/div. Set the time/div ~50 ms/div or near there (you might have to make some adjustments - once capture, then zoom in). You can move the trace to the middle (arbitrary actually) of the oscilloscope. Next, you will have to set the trigger source. Select the channel (probe) that you’re using to measure the digital stream. Select rising edge. Adjust the trigger level so that it is approximately the midpoint of what ever the max peak voltage of the digital stream is. Set the trigger mode to normal. Some scopes are different this should cover most of the small steps to set it up. After doing so, start the stream so that it is captured.

This is good so that you verify in general if both the signal is being sent, and that the signal is being sent in the correct form.

This is strange. Yes, please verify with oscilloscope.

Update:
You will have to adjust the time/div setting. I was assuming that you were only sending 5 bytes. But you also have to consider the inter-byte delay setting. One byte takes approximately ~ 11*(1/4800) = 2.3 ms. With 5 bytes, this implies: 5*2.3 ms + 4 * 50 ms = 211 ms. Set the time/div to ~ 200 ms.

Note that I am guesstimating here as to the best setting. Play around with it to see what best works for you.

Thanks Paul,

I made a mistake in the text. When I first read the data, I forgot to set the expected return from 5 to 15. Consternated, I began to write the post then remembered my error. Your code did return all 3 commands - I did not delete all the incorrect text - sorry.

I’ll need some time. I hate to tear the setup apart on the bench and the desk in the radio room has not much space for the monstrosity that is the TDS, so I need to shuffle. Plus, we have a boatload of people coming for the 4th and I have work to do.

As far as measuring, thanks for the hints. I originally figured I can loop a \0x00 with one stop bit and home in on a square wave (who’s low level would essentially be made of 8 bits) and then start fiddling with the time base. I still have to figure out how to set memory length (time), sample rate, how to attach it to the trigger, and finally display one above the other once captured. Cake for you, new horizons for me. Good to learn. We had Agilent MSOs if I needed to capture an RF envelope. I don’t know this instrument’s menus and advanced capabilities… To me it is a Hobbyist’s scope.

To the Group, should I have success in a day or two, I’ll write. Other than that, EVERYONE, have a wonderful and safe Independence Day Weekend and I hope to reconnect after that.

Thanks, All.
John

Ok, good to know.

One last check. Can you type the following in the command prompt:

pip list

Do you have both serial and pyserial installed on your pc? If so, delete serial and keep pyserial. If not on the list, then install pyserial.

pip uninstall serial

For this line:

time.sleep(5)

The only reason that I had set it so high (5 seconds) is to give the transceiver enough time to respond and update its display. It is not a requirement. You can lower it to say ~0.20 (just 200 ms - so that there is clear separation between instruction streams is all).

You can also replace this:

    response = ser.readline().decode('utf-8').strip()

    if response:
        print(f"Received: {response}")

with this:

    while True:

        response = ser.readline().decode('utf-8').strip()

        if len(response) > 0:
            print(response)
            break

… so that it waits for a response.

You can insert it for the other instructions as well. However, since it is a while loop, it will run until you receive a response - which may hang up if no response is detected. To alleviate this, you can add a time.sleep(0.05) instruction at the end of every loop, add a flag counter to count the number of times it has looped. Once it reaches a count of ~20 (for one second total wait time), it will break and go on to the next instruction or continue with the rest of the script.

Ok, enjoy the 4th of July!

Good luck!